ARTIST Tutorial: Single Heliostat Ray Tracing
Note
You can find the corresponding Python script for this tutorial here:
https://github.com/ARTIST-Association/ARTIST/blob/main/tutorials/01_single_heliostat_raytracing_tutorial.py
This tutorial provides a brief introduction to ARTIST and demonstrates how heliostat ray tracing is performed for a
single heliostat. The tutorial walks through several basic concepts necessary for understanding ARTIST, including:
How to load a scenario.
How to select specific heliostats for alignment and ray tracing.
Activating the heliostat kinematics to align the heliostat for ray tracing.
Performing heliostat ray tracing to generate flux density images on the tower’s target areas.
Warning
This tutorial is specifically designed to help you get a feel for ARTIST and therefore only works for scenarios
containing a single heliostat. This is not how ARTIST is typically used in practice. For a more complete
overview, consider the tutorial on distributed ray tracing.
Loading a Scenario
You can load any scenario for this tutorial, as long as it only contains a single heliostat. In the data/scenarios/
folder located within the tutorials/ directory, we have included a single_heliostat_scenario.h5 file that can be
used with this tutorial.
Please adjust the path and name of the scenario_path variable:
# Specify the path to your scenario.h5 file.
scenario_path = pathlib.Path("please/insert/the/path/to/the/scenario/here/scenarios/single_heliostat_scenario.h5")
Once you have adjusted this path, you can load the scenario by calling the load_scenario_from_hdf5() method. This
method is a Python classmethod that initializes a Scenario object based on the configuration contained in
the HDF5 file:
# Load the scenario.
with h5py.File(scenario_path) as scenario_path:
    scenario = Scenario.load_scenario_from_hdf5(
        scenario_file=scenario_path, device=device
    )
When loading the scenario, a large number of log messages are generated:
[2026-04-16 12:46:28,529][artist.scenario.scenario][INFO] - Loading an ARTIST scenario HDF5 file. This scenario file is version 1.0.
[2026-04-16 12:46:28,530][artist.field.tower_target_areas_planar][INFO] - Loading the planar tower target areas from an HDF5 file.
[2026-04-16 12:46:29,634][artist.field.tower_target_areas_cylindrical][INFO] - Loading the cylindrical tower target areas from an HDF5 file.
[2026-04-16 12:46:29,636][artist.scene.light_source_array][INFO] - Loading a light source array from an HDF5 file.
[2026-04-16 12:46:29,637][artist.scene.sun][INFO] - Loading sun_1 from an HDF5 file.
[2026-04-16 12:46:29,638][artist.scene.sun][INFO] - Initializing a sun modeled with a multivariate normal distribution.
[2026-04-16 12:46:30,854][artist.scenario.scenario][WARNING] - No individual kinematics first_joint_translation_e for None set. Using default values!
[2026-04-16 12:46:30,855][artist.scenario.scenario][WARNING] - No individual kinematics first_joint_translation_n for None set. Using default values!
[2026-04-16 12:46:30,855][artist.scenario.scenario][WARNING] - No individual kinematics first_joint_translation_u for None set. Using default values!
[2026-04-16 12:46:30,855][artist.scenario.scenario][WARNING] - No individual kinematics first_joint_tilt_n for None set. Using default values!
[2026-04-16 12:46:30,855][artist.scenario.scenario][WARNING] - No individual kinematics first_joint_tilt_u for None set. Using default values!
[2026-04-16 12:46:30,855][artist.scenario.scenario][WARNING] - No individual kinematics second_joint_translation_e for None set. Using default values!
[2026-04-16 12:46:30,855][artist.scenario.scenario][WARNING] - No individual kinematics second_joint_translation_n for None set. Using default values!
[2026-04-16 12:46:30,855][artist.scenario.scenario][WARNING] - No individual kinematics second_joint_translation_u for None set. Using default values!
[2026-04-16 12:46:30,856][artist.scenario.scenario][WARNING] - No individual kinematics second_joint_tilt_e for None set. Using default values!
[2026-04-16 12:46:30,856][artist.scenario.scenario][WARNING] - No individual kinematics second_joint_tilt_n for None set. Using default values!
[2026-04-16 12:46:30,856][artist.scenario.scenario][WARNING] - No individual kinematics concentrator_translation_e for None set. Using default values!
[2026-04-16 12:46:30,856][artist.scenario.scenario][WARNING] - No individual kinematics concentrator_translation_n for None set. Using default values!
[2026-04-16 12:46:30,856][artist.scenario.scenario][WARNING] - No individual kinematics concentrator_translation_u for None set. Using default values!
[2026-04-16 12:46:30,859][artist.field.heliostat_field][INFO] - Loading a heliostat field from an HDF5 file.
[2026-04-16 12:46:30,859][artist.field.heliostat_field][INFO] - Individual surface parameters not provided - loading a heliostat with the surface prototype.
[2026-04-16 12:46:30,859][artist.field.heliostat_field][INFO] - Individual kinematics configuration not provided - loading a heliostat with the kinematics prototype.
[2026-04-16 12:46:30,859][artist.field.heliostat_field][INFO] - Individual actuator configurations not provided - loading a heliostat with the actuator prototype.
[2026-04-16 12:46:30,883][artist.field.heliostat_field][INFO] - Added a heliostat group with kinematics type: rigid_body, and actuator type: ideal, to the heliostat field.
These log messages consist of three brackets:
The first bracket, e.g.,
[2026-04-16 12:46:30,883], displays the time stamp.The second bracket, e.g.,
[artist.util.scenario], displays the module that generated the log message.The third bracket, e.g.,
[INFO]or[WARNING], displays the log level.Finally, the actual log message is printed after the three brackets.
While there are quite a few log messages, there are two important aspects you should note:
The majority of the messages are warnings. However, this is not a problem. We are considering a simplified scenario and therefore do not include specific kinematics or actuator parameters or deviations. As a result,
ARTISTthrows a warning and automatically uses the default values. This behavior is expected and we can ignore the warnings.The remaining messages are info messages. These messages indicate which objects are being loaded from the HDF5 file and provide additional details about them.
Before we start using this scenario, we can inspect it, for example, by printing the scenario properties or checking which type of light source and target area is included:
# Inspect the scenario.
print(scenario)
print(
    f"The light source is a {scenario.light_sources.light_source_list[indices.first_light_source].__class__.__name__}."
)
print(
    f"The target areas have the following index mapping: {scenario.solar_tower.target_name_to_index}."
)
print(
    f"The first heliostat in the first group in the field is {scenario.heliostat_field.heliostat_groups[indices.first_heliostat_group].names[indices.first_heliostat]}."
)
print(
    f"The location of {scenario.heliostat_field.heliostat_groups[indices.first_heliostat_group].names[indices.first_heliostat]} is: {scenario.heliostat_field.heliostat_groups[indices.first_heliostat_group].positions[indices.first_heliostat].tolist()}."
)
This code generates the following output:
ARTIST Scenario containing:
        A Power Plant located at: [0.0, 0.0, 0.0] with 2 Target Area(s), 1 Light Source(s), and 1 Heliostat(s).
The light source is a Sun.
The target areas have the following index mapping: {'planar': 0, 'cylinder': 1}.
The first heliostat in the first group in the field is heliostat_1.
The location of heliostat_1 is: [0.0, 5.0, 0.0, 1.0].
Selecting Active Heliostats and Target Areas
In ARTIST, heliostat information is stored per property. For example, there is one tensor containing all heliostat
positions for a specific heliostat group (see Artist Under the Hood). Similarly, there is one
tensor containing all aim points, and so on. To address a specific heliostat, it is important to know its index.
To activate one or more heliostats for the alignment process or ray tracing, you can mark the corresponding entries in
the active_heliostats_mask tensor at the heliostats’ indices with a 1 :
active_heliostats_mask = torch.tensor([1], dtype=torch.int32, device=device)
Then we activate these heliostats by calling the activate_heliostats() method:
# Activate the heliostat. Only activated heliostats will be aligned or ray-traced.
scenario.heliostat_field.heliostat_groups[indices.first_heliostat_group].activate_heliostats(
    active_heliostats_mask=active_heliostats_mask,
    device=device,
)
The same is true for the target areas. We select the desired target areas directly via their indices:
# We select the first target area as the designated target for this heliostat.
target_area_indices = torch.tensor([0], device=device)
Now, we can define the aim point as this target area’s center:
# Use the center of the selected target area as the aim point.
aim_point = scenario.solar_tower.get_centers_of_target_areas(
    target_area_indices=target_area_indices, device=device
)
print(f"The initial aim point used for this raytracing is {aim_point.tolist()}.")
This produces the following output:
The initial aim point used for this raytracing is [[0.0, -50.0, 0.0, 1.0]]
indicating that the aim point is in the south.
Aligning Heliostats
Before we can start ray tracing, we need to align the heliostats. In the current scenario, our heliostat is initialized pointing straight up at the sky. Unfortunately, this orientation is not very useful for reflecting sunlight from the sun onto the receiver located in the south (see the aim point above).
Therefore, we make use of our knowledge regarding the heliostats’
positions,
aim points, and
kinematics model
to align them in an optimal orientation for reflection. To perform this orientation, we need an incident ray direction,
i.e., a direction vector originating from the light source and pointing towards the heliostat field.
ARTIST can accommodate heliostats with various kinematics and actuator types. Since each kinematics type and
actuator type computes the orientations of aligned heliostats slightly differently, we need to separate the heliostats
into HeliostatGroup objects. ARTIST handles this grouping automatically.
We first consider a scenario where the sun is also directly in the south, i.e., the incident ray direction points towards the north. When defining this direction, we have to make sure the vector is normalized:
# Incident ray directions need to be normalized.
incident_ray_directions = torch.tensor([[0.0, 1.0, 0.0, 0.0]], device=device)
Given this incident ray direction, we can align the heliostats with the following code:
# Align the heliostat(s).
scenario.heliostat_field.heliostat_groups[
    indices.first_heliostat_group
].align_surfaces_with_incident_ray_directions(
    aim_points=aim_point,
    incident_ray_directions=incident_ray_directions,
    active_heliostats_mask=active_heliostats_mask,
    device=device,
)
We can compare the original surface and the aligned surface of the first heliostat in the heliostat field in the following plot:

Since both the target area (planar) and the sun are directly to the south of the heliostat field, this alignment is physically plausible. The heliostat rotates 90 degrees along the east axis to reflect the incoming sunlight back in the direction it is coming from and thus toward the receiver.
Ray Tracing
With the heliostats now aligned, it is time to perform ray tracing to generate flux density images.
In this tutorial, we consider heliostat ray tracing. Heliostat ray tracing (as its name suggests) traces rays of sunlight starting from the heliostat. If we were to trace rays from the sun, only a small portion would hit the heliostat, and an even smaller portion of these rays would reach the receiver. Therefore, heliostat ray tracing is significantly more computationally efficient. Concretely, heliostat ray tracing involves three main steps:
We calculate the preferred reflection directions of all heliostats. This preferred reflection direction models the direction of a ray coming directly from the sun to the heliostat, i.e., along the incident ray direction. Specifically, this incident ray is reflected at every point on the heliostat surface to generate multiple ideal reflections.
This single ray only models an ideal direction, in reality the sun emits rays from many slightly different directions. Therefore, we use our model of the sun to generate distortions, which we use to slightly perturb the preferred reflection directions multiple times, thus generating many realistically reflected rays.
We trace these rays onto the target area by performing line-plane intersection tests and computing the resulting flux density image on the receiver. If the selected target area were a cylindrical target area,
ARTISTwould call the line-cylinder intersection tests to compute the resulting flux.
Luckily, ARTIST automatically performs all of these steps within the HeliostatRayTracer class. Therefore, ray
tracing with ARTIST involves only two simple lines of code. First, we define the HeliostatRayTracer. A
HeliostatRayTracer requires a Scenario object and the currently considered HeliostatGroup:
# Create a ray tracer.
ray_tracer = HeliostatRayTracer(
    scenario=scenario,
    heliostat_group=scenario.heliostat_field.heliostat_groups[indices.first_heliostat_group],
)
Internally, a HeliostatRayTracer uses a torch.Dataset to generate rays, apply distortions to the preferred
reflection directions, perform line-target-area intersections, and compute the resulting flux density images. This process
runs parallel for all heliostats in the scenario. It is also possible to use a data-parallel setup for the
HeliostatRayTracer to split the computation across multiple devices (see the tutorial on
distributed raytracing).
With everything now set up, we can generate a flux density image by calling the trace_rays() function with the
desired incident ray directions, the active heliostat indices, and the target area indices (for this tutorial we use the
planar target area).
# Perform heliostat-based ray tracing.
image_south, _, _, _ = ray_tracer.trace_rays(
    incident_ray_directions=incident_ray_directions,
    active_heliostats_mask=active_heliostats_mask,
    target_area_indices=target_area_indices,
    device=device,
)
If we plot the output, we get the following flux density image:

That’s it – a simple example of heliostat ray tracing with ARTIST!
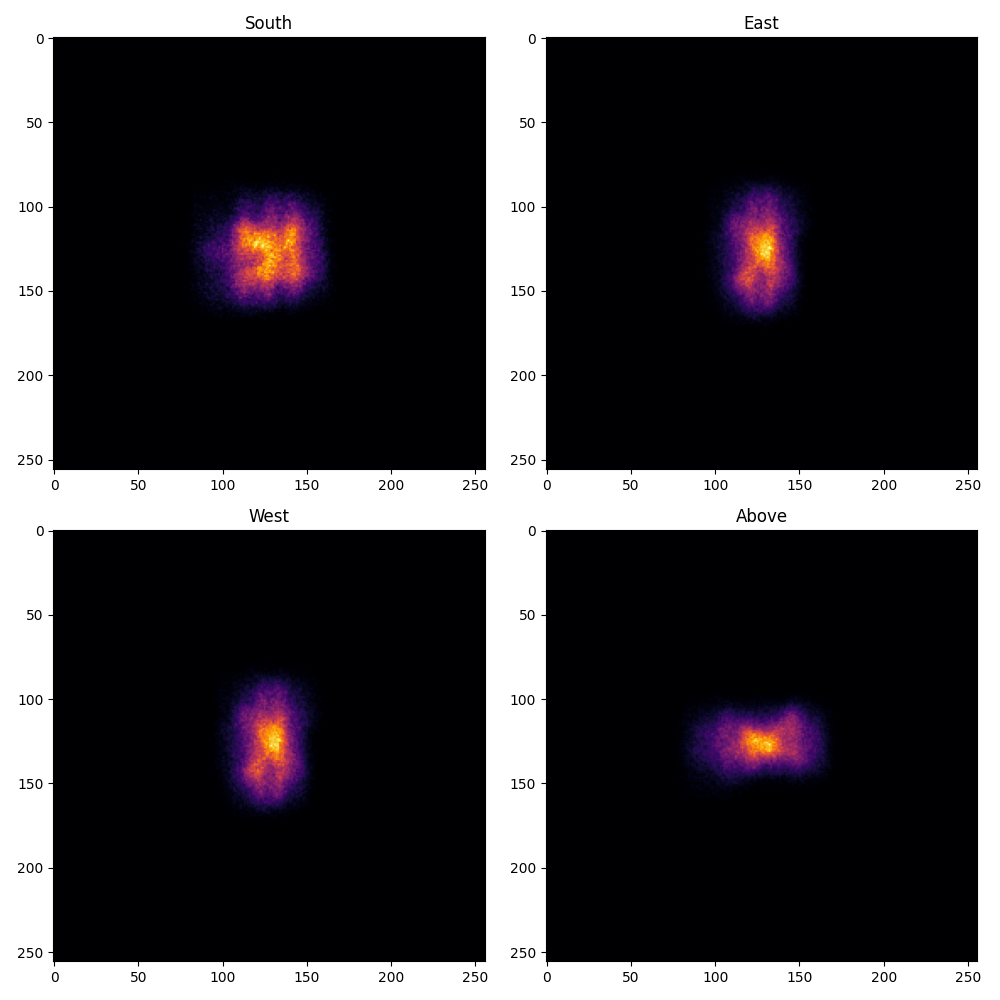
Of course, this scenario can perform ray tracing for any incident ray direction. For example, we can consider three additional incident ray directions and perform ray tracing using a helper function that combines alignment and ray tracing:
# Define light directions.
incident_ray_direction_east = torch.tensor([[-1.0, 0.0, 0.0, 0.0]], device=device)
incident_ray_direction_west = torch.tensor([[1.0, 0.0, 0.0, 0.0]], device=device)
incident_ray_direction_above = torch.tensor([[0.0, 0.0, -1.0, 0.0]], device=device)

# Perform alignment and ray tracing to generate flux density images.
image_east = align_and_trace_rays(
    light_direction=incident_ray_direction_east,
    active_heliostats_mask=active_heliostats_mask,
    target_area_indices=target_area_indices,
    device=device,
)
image_west = align_and_trace_rays(
    light_direction=incident_ray_direction_west,
    active_heliostats_mask=active_heliostats_mask,
    target_area_indices=target_area_indices,
    device=device,
)
image_above = align_and_trace_rays(
    light_direction=incident_ray_direction_above,
    active_heliostats_mask=active_heliostats_mask,
    target_area_indices=target_area_indices,
    device=device,
)
Plotting the results of all four considered incident ray directions produces the following image:
We hope this tutorial gave you an idea of how ARTIST works – check out further tutorials for a more in-depth
demonstration of what you can do with our software.
Note
The images generated in this tutorial are for illustrative purposes, often with reduced resolution and without
hyperparameter optimization. Therefore, they should not be interpreted as a measure of the quality of ARTIST.
Please see our publications for further information.